OpenCV基本阈值操作
2021-02-06 15:03 更新
目标
在本教程中,您将学习如何:
- 使用OpenCV函数cv :: threshold执行基本阈值操作
Cool Theory
- 注意
- 下面的解释属于Bradski和Kaehler 的“ 学习OpenCV ”一书。什么是
阈值?
- 最简单的分割方法
- 应用示例:分离对应于我们想要分析的对象的图像的区域。该分离基于对象像素和背景像素之间的强度变化。
- 为了区分我们感兴趣的像素(其最终将被拒绝),我们对每个像素强度值相对于阈值进行比较(根据要解决的问题确定)。
- 一旦我们正确分离了重要的像素,我们可以用一个确定的值来设置它们来识别它们(即我们可以为它们分配值(黑色),(白色)或适合您需要的任何值)。0255
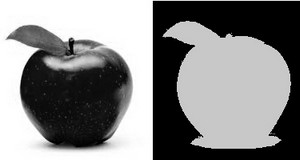
阈值类型
- OpenCV提供函数cv :: threshold来执行阈值操作。
- 我们可以使用此功能实现种类型的阈值操作。我们将在以下小节中解释。5
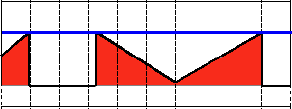
- 为了说明这些阈值过程的工作原理,我们假设我们有一个具有强度值为像素的源图像。下面的情节描绘了这一点。蓝色水平线表示阈值(固定)。src(x,y)thresh
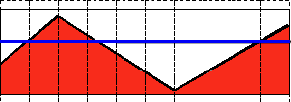
阈值二进制
- 该阈值操作可以表示为:d

- 因此,如果像素的强度s r c (x ,y)高于 thresh,则将新的像素强度设置为MaxVal。否则,像素被设置为0.
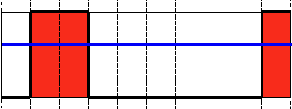
阈值二进制,倒数
- 该阈值操作可以表示为:

- 因此,如果像素的强度s r c (x ,y)高于 thresh,则将新的像素强度设置为0。否则,像素被设置为MaxVal.
截短
- 该阈值操作可以表示为:

- 像素的最大强度值是thresh,如果src(x,y)较大,则其值被截断。见下图:
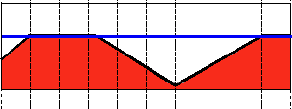
阈值为零
- 此操作可以表示为:

- 如果src(x,y)低于 thresh,则新像素值将被设置为0。

阈值为零,倒置
- 此操作可以表示为:

- 如果src(x,y)大于thresh,则新像素值将被设置为0。
Code
教程代码如下所示。您也可以从这里下载
#include "opencv2/imgproc.hpp"
#include "opencv2/imgcodecs.hpp"
#include "opencv2/highgui.hpp"
using namespace cv;
int threshold_value = 0;
int threshold_type = 3;
int const max_value = 255;
int const max_type = 4;
int const max_BINARY_value = 255;
Mat src, src_gray, dst;
const char* window_name = "Threshold Demo";
const char* trackbar_type = "Type: \n 0: Binary \n 1: Binary Inverted \n 2: Truncate \n 3: To Zero \n 4: To Zero Inverted";
const char* trackbar_value = "Value";
void Threshold_Demo( int, void* );
int main( int argc, char** argv )
{
  String imageName("../data/stuff.jpg"); // by default
  if (argc > 1)
  {
      imageName = argv[1];
  }
  src = imread( imageName, IMREAD_COLOR ); // Load an image
  if( src.empty() )
    { return -1; }
  cvtColor( src, src_gray, COLOR_BGR2GRAY ); // Convert the image to Gray
  namedWindow( window_name, WINDOW_AUTOSIZE ); // Create a window to display results
  createTrackbar( trackbar_type,
                  window_name, &threshold_type,
                  max_type, Threshold_Demo ); // Create Trackbar to choose type of Threshold
  createTrackbar( trackbar_value,
                  window_name, &threshold_value,
                  max_value, Threshold_Demo ); // Create Trackbar to choose Threshold value
  Threshold_Demo( 0, 0 ); // Call the function to initialize
  for(;;)
    {
      char c = (char)waitKey( 20 );
      if( c == 27 )
    { break; }
    }
}
void Threshold_Demo( int, void* )
{
  /* 0: Binary
     1: Binary Inverted
     2: Threshold Truncated
     3: Threshold to Zero
     4: Threshold to Zero Inverted
   */
  threshold( src_gray, dst, threshold_value, max_BINARY_value,threshold_type );
  imshow( window_name, dst );
}
说明
- 我们来看一下程序的一般结构:
- 加载图像。如果是BGR,我们将其转换为灰度。为此,请记住我们可以使用函数cv :: cvtColor:
  String imageName("../data/stuff.jpg"); // by default
  if (argc > 1)
  {
      imageName = argv[1];
  }
  src = imread( imageName, IMREAD_COLOR ); // Load an image
  if( src.empty() )
    { return -1; }
cvtColor( src, src_gray, COLOR_BGR2GRAY ); // Convert the image to Gray- 创建一个窗口来显示结果
namedWindow( window_name, WINDOW_AUTOSIZE ); // Create a window to display results
- 创建轨道栏供用户输入用户输入:2
- 阈值类型:二进制,零等
- 阈值
  createTrackbar( trackbar_type,
                  window_name, &threshold_type,
                  max_type, Threshold_Demo ); // Create Trackbar to choose type of Threshold
  createTrackbar( trackbar_value,
                  window_name, &threshold_value,
max_value, Threshold_Demo ); // Create Trackbar to choose Threshold value- 等待用户输入阈值,阈值类型(或直到程序退出)
- 每当用户更改任何Trackbars的值时,将调用Threshold_Demo函数:
void Threshold_Demo( int, void* )
{
  /* 0: Binary
     1: Binary Inverted
     2: Threshold Truncated
     3: Threshold to Zero
     4: Threshold to Zero Inverted
   */
  threshold( src_gray, dst, threshold_value, max_BINARY_value,threshold_type );
  imshow( window_name, dst );
}正如你所看到的,函数cv :: threshold被调用。我们给出五个参数:
- src_gray:我们的输入图像
- dst:目的地(输出)图像
- threshold_value:进行阈值操作时阈值的大小。
- max_BINARY_value:与二进制阈值操作(用于设置所选像素)一起使用的值
- threshold_type:阈值操作之一。它们列在上述功能的注释部分。
结果
- 编译此程序后,运行它给一个图像的路径作为参数。例如,对于输入图像为:
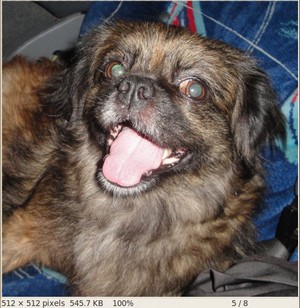
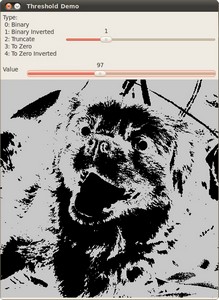
- 首先,我们尝试用二进制threhold反转阈值我们的图像。我们预计,比亮起的像素将变暗,这是实际发生的,正如我们在下面的快照中看到的(从原始图像注意到,小狗的舌头和眼睛与图像相比特别明亮,这个反映在输出图像中)。吨ħ ř Ë 小号ħ
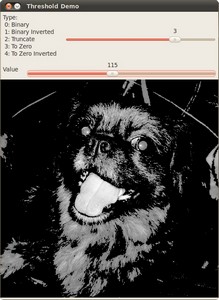
- 现在我们尝试将阈值设为零。这样,我们预期最暗像素(阈值以下)将变为完全黑色,而值大于阈值的像素将保持其原始值。这通过输出图像的以下快照来验证:
以上内容是否对您有帮助:


更多建议: