Bootstrap5 表单
在本章中,我们将学习如何使用 Bootstrap 创建表单。Bootstrap 通过一些简单的 HTML 标签和扩展的类即可创建出不同样式的表单。
表单元素 <input>, <textarea>, 和 <select> elements 在使用 .form-control 类的情况下,宽度都是设置为 100%。
Bootstrap5 表单布局
- 堆叠表单 (全屏宽度):垂直方向
- 内联表单:水平方向
Bootstrap 提供了两种类型的表单布局:
堆叠表单
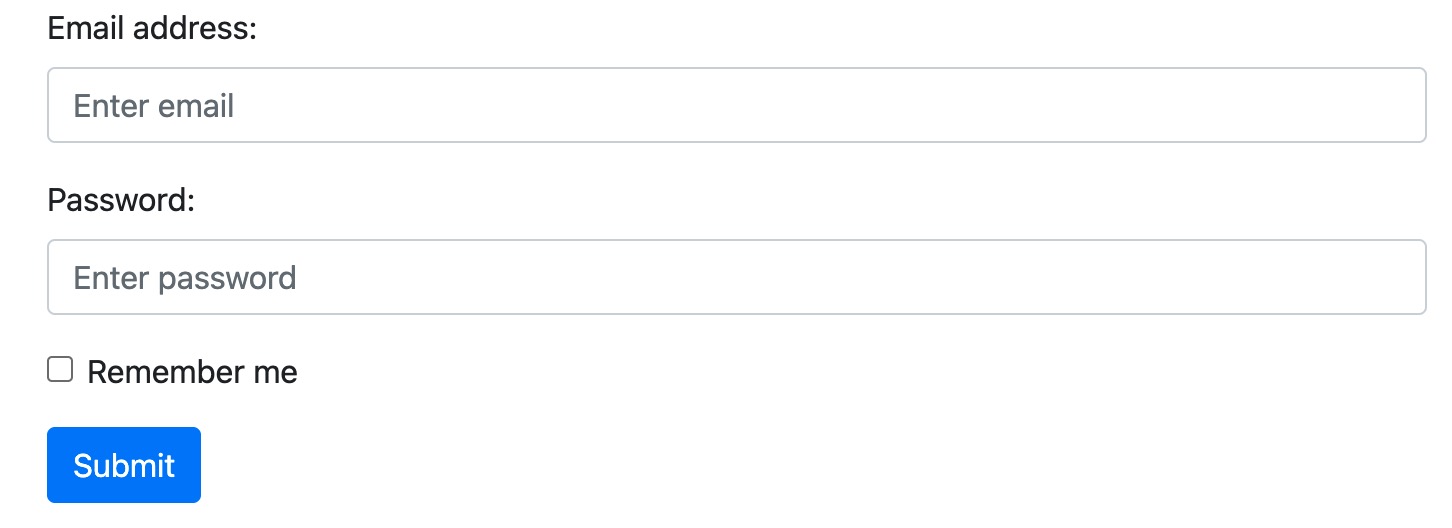
以下实例使用两个输入框,一个复选框,一个提交按钮来创建堆叠表单:
<!DOCTYPE html>
<html>
<head>
  <title>Bootstrap5 实例</title>
  <meta charset="utf-8">
  <meta name="viewport" content="width=device-width, initial-scale=1">
  <link href="https://cdn.staticfile.org/twitter-bootstrap/5.1.1/css/bootstrap.min.css" rel="external nofollow" target="_blank"  rel="external nofollow" target="_blank"  rel="external nofollow" target="_blank"  rel="external nofollow" target="_blank"  rel="external nofollow" target="_blank"  rel="external nofollow" target="_blank"  rel="external nofollow" target="_blank"  rel="stylesheet">
  <script src="https://cdn.staticfile.org/twitter-bootstrap/5.1.1/js/bootstrap.bundle.min.js" rel="external nofollow"  rel="external nofollow"  rel="external nofollow"  rel="external nofollow"  rel="external nofollow"  rel="external nofollow"  rel="external nofollow" ></script>
</head>
<body>

<div class="container mt-3">
  <h2>堆叠表单</h2>
	<form action="">
	  <div class="mb-3 mt-3">
		<label for="email" class="form-label">Email:</label>
		<input type="email" class="form-control" id="email" placeholder="Enter email" name="email">
	  </div>
	  <div class="mb-3">
		<label for="pwd" class="form-label">Password:</label>
		<input type="password" class="form-control" id="pwd" placeholder="Enter password" name="pswd">
	  </div>
	  <div class="form-check mb-3">
		<label class="form-check-label">
		  <input class="form-check-input" type="checkbox" name="remember"> Remember me
		</label>
	  </div>
	  <button type="submit" class="btn btn-primary">Submit</button>
	</form>
</div>

</body>
</html>显示效果:

实例中我们使用 .form-label 类来确保标签元素有一定的内边距。
复选框(checkboxe)使用不同的标记。 它们使用 .form-check 包裹在容器元素周围。复选框和单选按钮使用 .form-check-input,它的标签可以使用 .form-check-label 类。
内联表单
如果您希望表单元素并排显示,请使用 .row 和 .col:
以下实例的两个输入框并排显示,创建内联表单:
<!DOCTYPE html>
<html>
<head>
  <title>Bootstrap5 实例</title>
  <meta charset="utf-8">
  <meta name="viewport" content="width=device-width, initial-scale=1">
  <link href="https://cdn.staticfile.org/twitter-bootstrap/5.1.1/css/bootstrap.min.css" rel="external nofollow" target="_blank"  rel="external nofollow" target="_blank"  rel="external nofollow" target="_blank"  rel="external nofollow" target="_blank"  rel="external nofollow" target="_blank"  rel="external nofollow" target="_blank"  rel="external nofollow" target="_blank"  rel="stylesheet">
  <script src="https://cdn.staticfile.org/twitter-bootstrap/5.1.1/js/bootstrap.bundle.min.js" rel="external nofollow"  rel="external nofollow"  rel="external nofollow"  rel="external nofollow"  rel="external nofollow"  rel="external nofollow"  rel="external nofollow" ></script>
</head>
<body>

<div class="container mt-3">
  <h2>内联表单</h2>
  <p>如果您希望表单元素并排显示,请使用 .row 和 .col:</p>
  <form>
    <div class="row">
      <div class="col">
        <input type="text" class="form-control" placeholder="Enter email" name="email">
      </div>
      <div class="col">
        <input type="password" class="form-control" placeholder="Enter password" name="pswd">
      </div>
    </div>
  </form>
</div>

</body>
</html>显示效果:

文本框
使用 textarea 标签创建文本框提交表单,使用 .form-control 类渲染文本框 textareas 标签:
<!DOCTYPE html>
<html>
<head>
  <title>Bootstrap5 实例</title>
  <meta charset="utf-8">
  <meta name="viewport" content="width=device-width, initial-scale=1">
  <link href="https://cdn.staticfile.org/twitter-bootstrap/5.1.1/css/bootstrap.min.css" rel="external nofollow" target="_blank"  rel="external nofollow" target="_blank"  rel="external nofollow" target="_blank"  rel="external nofollow" target="_blank"  rel="external nofollow" target="_blank"  rel="external nofollow" target="_blank"  rel="external nofollow" target="_blank"  rel="stylesheet">
  <script src="https://cdn.staticfile.org/twitter-bootstrap/5.1.1/js/bootstrap.bundle.min.js" rel="external nofollow"  rel="external nofollow"  rel="external nofollow"  rel="external nofollow"  rel="external nofollow"  rel="external nofollow"  rel="external nofollow" ></script>
</head>
<body>

<div class="container mt-3">
  <h2>文本框</h2>
  <p>使用 .form-control 类渲染文本框 textareas 标签:</p>
  <form action="/action_page.php">
    <div class="mb-3 mt-3">
      <label for="comment">请输入评论:</label>
      <textarea class="form-control" rows="5" id="comment" name="text"></textarea>
    </div>
    <button type="submit" class="btn btn-primary">提交</button>
  </form>
</div>

</body>
</html>显示效果:

输入框大小
我们可以通过在 .form-control 输入框中使用 .form-control-lg 或 .form-control-sm 类来设置输入框的大小:
<!DOCTYPE html>
<html>
<head>
  <title>Bootstrap5 实例</title>
  <meta charset="utf-8">
  <meta name="viewport" content="width=device-width, initial-scale=1">
  <link href="https://cdn.staticfile.org/twitter-bootstrap/5.1.1/css/bootstrap.min.css" rel="external nofollow" target="_blank"  rel="external nofollow" target="_blank"  rel="external nofollow" target="_blank"  rel="external nofollow" target="_blank"  rel="external nofollow" target="_blank"  rel="external nofollow" target="_blank"  rel="external nofollow" target="_blank"  rel="stylesheet">
  <script src="https://cdn.staticfile.org/twitter-bootstrap/5.1.1/js/bootstrap.bundle.min.js" rel="external nofollow"  rel="external nofollow"  rel="external nofollow"  rel="external nofollow"  rel="external nofollow"  rel="external nofollow"  rel="external nofollow" ></script>
</head>
<body>


<div class="container mt-3">
  <h2>输入框大小</h2>
  <p>我们可以通过在 .form-control 输入框中使用 .form-control-lg 或 .form-control-sm 类来设置输入框的大小:</p>
  <form>
    <input type="text" class="form-control form-control-lg" placeholder="大号输入框">
	<input type="text" class="form-control mt-3" placeholder="正常大小输入框">
	<input type="text" class="form-control form-control-sm mt-3" placeholder="小号输入框">
  </form>
</div>

</body>
</html>显示效果:

禁用/只读表单
使用 disabled/readonly 属性设置输入框禁用/只读:
<!DOCTYPE html>
<html>
<head>
  <title>Bootstrap5 实例</title>
  <meta charset="utf-8">
  <meta name="viewport" content="width=device-width, initial-scale=1">
  <link href="https://cdn.staticfile.org/twitter-bootstrap/5.1.1/css/bootstrap.min.css" rel="external nofollow" target="_blank"  rel="external nofollow" target="_blank"  rel="external nofollow" target="_blank"  rel="external nofollow" target="_blank"  rel="external nofollow" target="_blank"  rel="external nofollow" target="_blank"  rel="external nofollow" target="_blank"  rel="stylesheet">
  <script src="https://cdn.staticfile.org/twitter-bootstrap/5.1.1/js/bootstrap.bundle.min.js" rel="external nofollow"  rel="external nofollow"  rel="external nofollow"  rel="external nofollow"  rel="external nofollow"  rel="external nofollow"  rel="external nofollow" ></script>
</head>
<body>


<div class="container mt-3">
  <h2>禁用/只读表单</h2>
  <p>使用 disabled/readonly 属性设置输入框禁用/只读:</p>
  <form>
    <input type="text" class="form-control" placeholder="Normal input">
	<input type="text" class="form-control mt-3" placeholder="Disabled input" disabled>
	<input type="text" class="form-control mt-3" placeholder="Readonly input" readonly>
  </form>
</div>

</body>
</html>纯文本输入
使用 .form-control-plaintext 类可以删除输入框的边框:
<!DOCTYPE html>
<html>
<head>
  <title>Bootstrap5 实例</title>
  <meta charset="utf-8">
  <meta name="viewport" content="width=device-width, initial-scale=1">
  <link href="https://cdn.staticfile.org/twitter-bootstrap/5.1.1/css/bootstrap.min.css" rel="external nofollow" target="_blank"  rel="external nofollow" target="_blank"  rel="external nofollow" target="_blank"  rel="external nofollow" target="_blank"  rel="external nofollow" target="_blank"  rel="external nofollow" target="_blank"  rel="external nofollow" target="_blank"  rel="stylesheet">
  <script src="https://cdn.staticfile.org/twitter-bootstrap/5.1.1/js/bootstrap.bundle.min.js" rel="external nofollow"  rel="external nofollow"  rel="external nofollow"  rel="external nofollow"  rel="external nofollow"  rel="external nofollow"  rel="external nofollow" ></script>
</head>
<body>


<div class="container mt-3">
  <h2>纯文本输入</h2>
  <p>使用 .form-control-plaintext 类可以删除输入框的边框:</p>
  <form>
    <input type="text" class="form-control-plaintext" placeholder="无边框的输入框">
	<input type="text" class="form-control" placeholder="正常输入框">
  </form>
</div>

</body>
</html>取色器
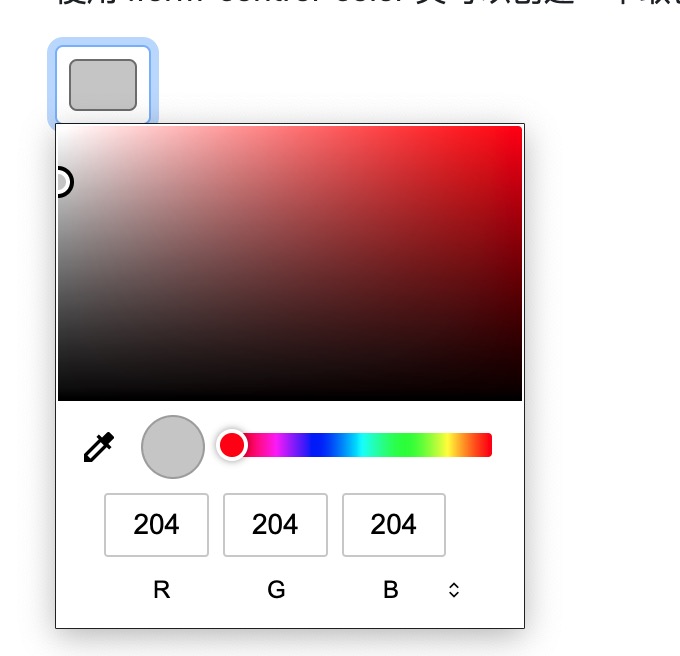
使用 .form-control-color 类可以创建一个取色器:
<!DOCTYPE html>
<html>
<head>
  <title>Bootstrap5 实例</title>
  <meta charset="utf-8">
  <meta name="viewport" content="width=device-width, initial-scale=1">
  <link href="https://cdn.staticfile.org/twitter-bootstrap/5.1.1/css/bootstrap.min.css" rel="external nofollow" target="_blank"  rel="external nofollow" target="_blank"  rel="external nofollow" target="_blank"  rel="external nofollow" target="_blank"  rel="external nofollow" target="_blank"  rel="external nofollow" target="_blank"  rel="external nofollow" target="_blank"  rel="stylesheet">
  <script src="https://cdn.staticfile.org/twitter-bootstrap/5.1.1/js/bootstrap.bundle.min.js" rel="external nofollow"  rel="external nofollow"  rel="external nofollow"  rel="external nofollow"  rel="external nofollow"  rel="external nofollow"  rel="external nofollow" ></script>
</head>
<body>


<div class="container mt-3">
  <h2>取色器</h2>
  <p>使用 .form-control-color 类可以创建一个取色器:</p>
  <form>
    <input type="color" class="form-control form-control-color" value="#CCCCCC">
  </form>
</div>

</body>
</html>显示效果:


 免费AI编程助手


更多建议: