EasyUI Layout 布局
2018-09-12 13:34 更新
通过 $.fn.layout.defaults 重写默认的 defaults。
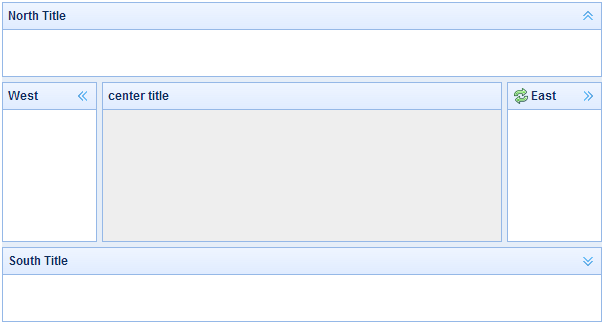
布局(layout)是有五个区域(北区 north、南区 south、东区 east、西区 west 和中区 center)的容器。中间的区域面板是必需的,边缘区域面板是可选的。每个边缘区域面板可通过拖拽边框调整尺寸,也可以通过点击折叠触发器来折叠面板。布局(layout)可以嵌套,因此用户可建立复杂的布局。

依赖 panel resizable
用法 创建布局(Layout)
1、通过标记创建布局(Layout)。
添加 'easyui-layout' class 到 <div> 标记。
    <div id="cc" class="easyui-layout" style="width:600px;height:400px;">
        <div data-options="region:'north',title:'North Title',split:true" style="height:100px;"></div>
        <div data-options="region:'south',title:'South Title',split:true" style="height:100px;"></div>
        <div data-options="region:'east',title:'East',split:true" style="width:100px;"></div>
        <div data-options="region:'west',title:'West',split:true" style="width:100px;"></div>
        <div data-options="region:'center',title:'center title'" style="padding:5px;background:#eee;"></div>
    </div>
2、在整个页面上创建布局(Layout)。
    <body class="easyui-layout">
        <div data-options="region:'north',title:'North Title',split:true" style="height:100px;"></div>
        <div data-options="region:'south',title:'South Title',split:true" style="height:100px;"></div>
        <div data-options="region:'east',title:'East',split:true" style="width:100px;"></div>
        <div data-options="region:'west',title:'West',split:true" style="width:100px;"></div>
        <div data-options="region:'center',title:'center title'" style="padding:5px;background:#eee;"></div>
    </body>
3、创建嵌套布局。
请注意,内部布局的西区面板是折叠的。
    <body class="easyui-layout">
        <div data-options="region:'north'" style="height:100px"></div>
        <div data-options="region:'center'">
            <div class="easyui-layout" data-options="fit:true">
                <div data-options="region:'west',collapsed:true" style="width:180px"></div>
                <div data-options="region:'center'"></div>
            </div>
        </div>
    </body>
4、通过 ajax 加载内容。
布局(layout)是基于面板(panel)创建的。各区域面板提供从 URL 动态加载内容的内建支持。使用动态加载技术,用户可以让他们的布局页面更快地显示。
    <body class="easyui-layout">
        <div data-options="region:'west',href:'west_content.php'" style="width:180px" ></div>
        <div data-options="region:'center',href:'center_content.php'" ></div>
    </body>
折叠布局面板(Collpase Layout Panel)
    $('#cc').layout();
    // collapse the west panel
    $('#cc').layout('collapse','west');
通过工具按钮添加西区面板
    $('#cc').layout('add',{
        region: 'west',
        width: 180,
        title: 'West Title',
        split: true,
        tools: [{
            iconCls:'icon-add',
            handler:function(){alert('add')}
        },{
            iconCls:'icon-remove',
            handler:function(){alert('remove')}
        }]
    });
布局选项(Layout Options)
二、使用案例 1.从远程站点加载数据
例 1 使用panel方法:
 <div id="Layout" class="easyui-layout" style="width: 100%;height:20%; overflow:auto;" >
    <div id="editorTB" style="width: 100%;height:20%;overflow:hidden;margin:0;" data-options="region:'center',fit:true, ">
    </div>
</div>
function getFarTableData() {
$('#Layout').layout('panel', 'center').panel('refresh','table.HTML');
}
或
function getFarTableData() {
$('#Layout').layout('panel', 'center').panel({href:'table.HTML'});
}例 2 使用add方法:
 <div id="Layout" class="easyui-layout" style="width: 100%;height:20%; overflow:auto;" >
</div>
function getFarTableData() {
$('#Layout').layout('add', {
region : 'center',
href:'table.HTML',
}))
}以上内容是否对您有帮助:

 免费AI编程助手


更多建议: